Revetment places: manual
Complete step-by-step guide to installing bank protections yourself — from permit to completion.
Manual
Install shore protection yourself
Installing sheet piling is a project that is also feasible for a handy private individual with the right preparation, materials and tools. In this manual we go through the complete process: from the first checks to finishing. Whether you choose hardwood sheet pile planks of Prolock plastic bulkheads, de basisstappen zijn vergelijkbaar.
A well-placed revetment protects your bank against erosion for decades, prevents the garden or plot from disappearing into the water piece by piece and gives your water edge a sleek, well-groomed appearance. So invest in good preparation — it will pay off in spades.
Overview
Installation in 7 steps
From permit to finishing — below you will find detailed explanations, tips and points of interest for each step.
-
Preparation & permits
Municipality and water board, measure and determine impact depth. Read step 1 →
-
Materials & tools
Order planks, posts, deck planks and stainless steel mounting. Read step 2 →
-
Soil preparation
Dig a trench, remove obstacles, check soil and drainage. Read step 3 →
-
Drive in posts
Corner posts, reference line and center-to-center distance 100–150 cm. Read step 4 →
-
Install planks or partitions
Install hardwood (tongue-and-groove) or Prolock (click-lock). Read step 5 →
-
Finishing
Install, fill and compact the deck plank. Read step 6 →
-
Control & aftercare
Final check level, no cavities behind the wall, keep documentation. Read step 7 →
Step 1
Preparation and permits
Before you put a shovel in the ground, check whether you need permission. Start on time — an application can take several weeks.
The municipality
Depending on location and size, a environmental permit are necessary — for example in protected areas, near monuments or when changing the water line.
The water board
For work on regional waterways you often need one water permit or at least a notification is required to the competent water board.
Detailed explanation about rules and application: permits for sheet piling.
Measure
Measure and mark the bank
Measure the entire bank length with a measuring tape (minimum 10 m). Mark the revetment line with pickets and stretch a rope as a guide.
- → Determine the height above the waterline
- → Calculate the required impact depth below ground level or waterline
- → Write down obstacles (bridges, pipes, trees) for the materials list
Step 2
Materials and tools
You compile the materials list based on your measurements. Order approx 5% extra as a buffer for sawing loss and unforeseen situations.
| Revetment | Hardwood sheet piling of Prolock Sigma |
|---|---|
| Poles | Hardwood 6x6 to 10x10 cm, or steel U-profiles for plastic |
| Deck plank | Hardwood or plastic — sleek finish and protection of head ends |
| Confirmation | Stainless steel A4 screws or bolts — never galvanized on hardwood |
| Backfill soil | Filling and compacting behind the sheet piling |
Tools
What do you need on site?
For smaller projects, hand tools are sufficient; For longer banks or heavy planks, a vibrating machine or piling system is useful.
Measuring & aligning
Measuring tape (10 m+), spirit level 120 cm+, pickets and construction line.
Groundwork
Shovel, spade and optional submersible pump for wet trench.
Places
Vibratory hammer, rubber mallet, impact head — never strike the tongue or post directly.
Attaching & sawing
Cordless drill with stainless steel bits, hand saw or circular saw.
Safety
Work shoes, gloves, hearing protection when piling.
Major projects
Hand piling system or vibrating machine for long banks and heavy piles.
Step 3
Soil preparation
Good soil preparation is the foundation of successful shoring. Follow these steps:
-
Dig a trench
Along the marked bank line, wide enough to work comfortably (approximately 40–60 cm) and deep enough for the planned impact depth.
-
Remove obstacles
Remove rocks, tree roots, debris and other obstructive materials from the trench. Large roots can damage planks or push them askew.
-
Check the soil conditions
In clay and peat soil, the soil can be soft and unstable. Consider longer posts and/or a deeper impact depth for extra stability.
-
Provide drainage
If a lot of water runs into the trench, use a submersible pump to keep the work area dry during installation.
For very boggy or unstable soil, we recommend calling in a professional. The ground conditions largely determine the lifespan and stability of the sheet piling.
Step 4
Drive in posts
The posts form the skeleton of your revetment. They absorb the ground pressure and keep the planks or partitions in place.
-
Heart-to-heart distance
100–150 cm between posts; For heavy ground pressure or a deep bank, choose 100 cm.
-
Corner posts first
Check with the spirit level that each post is perfectly vertical.
-
Tension reference line
Between the corner posts at top height — align all intermediate posts to this line.
-
Drive in intermediate posts
Vibratory hammer or percussion hammer with protective cover — never hit the post directly.
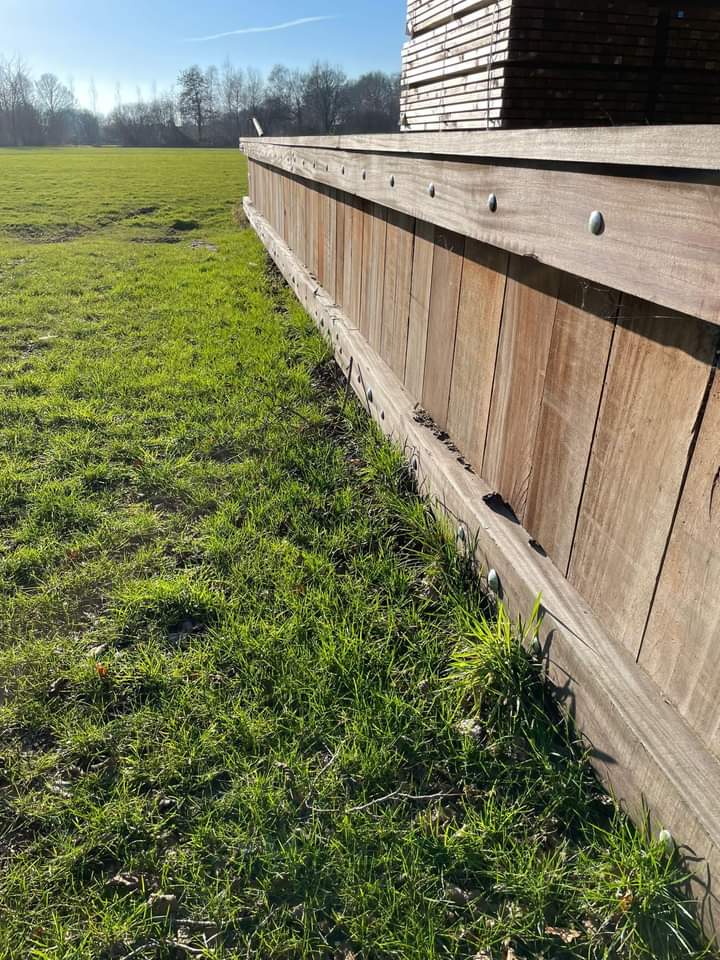
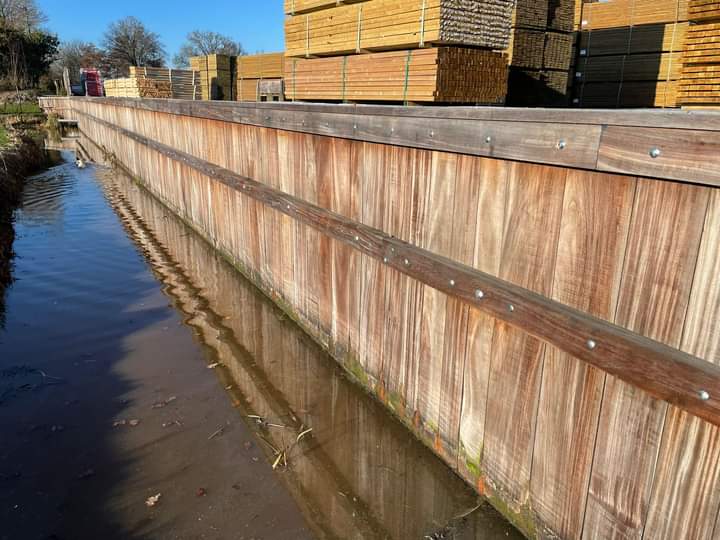
Step 5
Install planks or partitions
Work from one end to the other. After every few elements, check that the top line is straight and level.
Hardwood sheet piling
-
First shelf
Groove side towards the working direction; pressing or hitting into the slot with a vibrating block.
-
Tongue-and-groove
Next plank in the groove; never hit the tongue.
-
To confirm
Stainless steel screws to each post; check the level regularly.
Prolock plastic
-
First shot
Place in the slot next to the first post.
-
Click lock
Next shot click — audible click when connected.
-
To confirm
Recommended mounting per post; continues to the full bank length.
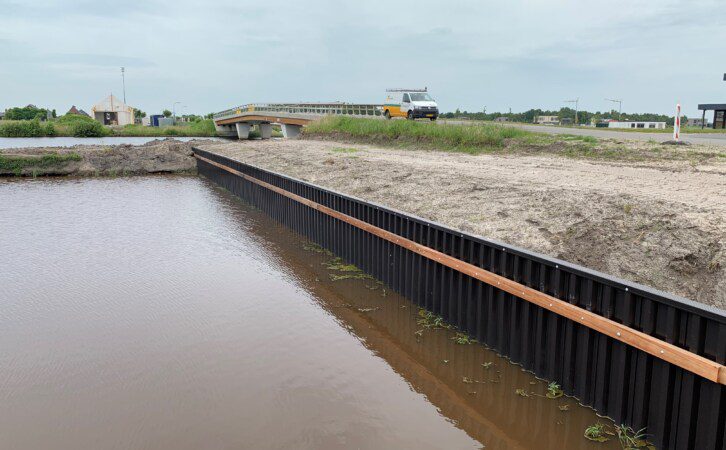
Step 6
Finishing with deck planks
The deck plank gives a sleek finish and protects the end ends against moisture.
-
Cut to size
At corners often 45° for a seamless connection.
-
Place & align
Place deck plank on top and check.
-
To confirm
Stainless steel screws on posts; pre-drilling for hardwood.
-
Filling & compacting
Fill the soil in layers of approximately 20 cm behind the wall.
-
Final check
Check the overall picture and level line.
Step 7
Control and aftercare
After delivery, a thorough inspection is essential. Run the entire length and note the following:
- → Topline straight and level over the entire length
- → No voids or uncompacted zones behind the sheet piling
- → All stainless steel fastenings tightened; no loose planks or partitions
- → Deck plank firmly mounted and head ends protected
- → Permit and any conditions of water board/municipality documented
Inspect annually for tilting or soil loss during the first few years. More about maintenance: lifespan and maintenance.
Points of attention
Avoid common mistakes
In our experience, these pitfalls are the most common — and are easily avoidable with good preparation.
Too shallow weft
At least one third of the plank length in the ground — otherwise subsidence or compression.
Galvanized steel
Always with hardwood Stainless steel A4 — galvanized is quickly corroded by tannic acids.
Too few poles
Saving on posts costs stability — keep 100–150 cm center to center.
Ignore water level
Seasonal changes in managed waterways — determine height with margin.
Do not compact soil
Uncompacted backfill collapses and causes pressure in unexpected places.
DIY or professional?
Do it yourself or hire a professional?
The complexity of your project determines whether installing it yourself is feasible. We are happy to provide you with tailor-made advice.
Do it yourself - easily feasible
- → Bank length up to approximately 15–20 meters
- → Bank height up to approximately 80 cm
- → Stable sandy or light clay soil
- → Prolock Sigma (click-lock)
- → Easily accessible location
Hire a professional
- → More than 20 meters of bank length
- → Bank height above 100 cm
- → Soft peat/clay soil, high groundwater
- → Mechanical piling required
- → Difficult to reach work area
We work with experienced contractors and gardeners throughout the Netherlands. Request a no-obligation quote.
Safety
Working safely on the shore
Working near water and with heavy equipment involves risks. Please observe these measures:
- → Sturdy work shoes and gloves; safety boots for wet work
- → Never alone in deep water — always someone nearby
- → KLIC notification before digging — underground pipes are extremely dangerous
- → Lift with the legs; azobé planks weigh 30–40 kg (50 mm)
- → Hearing protection when driving with a hammer or vibrating machine
- → Keep children and pets out of the work area
Budget
How much does it cost to install sheet piling?
Costs vary by material, bank length, elevation and ground conditions. For a complete project (material, posts, decking board, mounting):
| Indication total | € 40 – € 200 per linear meter |
|---|---|
| Groundwork | Depending on accessibility and trench depth |
| Placement | DIY vs. contractor; mechanical piling more expensive |
Read more
Everything for your sheet piling project
Permits
When do you need permission from the water board or municipality?
Read about permits →Cost per metre
Indicative prices per material type and additional costs.
View costs →Order materials
Hardwood sheet piling en Prolock Sigma direct online.
To products →Request a quote
Free, customized quote - response within 24 hours.
Request a quote →Ready to install your revetment?
Order materials in the webshop or request a no-obligation quote. Our specialists are happy to help you with advice on material selection and installation.